
Comparing Power BI and Excel: What’s the Best Business Analytics Tool?
In today's workplace, having multiple sources of information in various formats is common, but it can also lead to confusion and errors. Mismanaging these sources can result in missed opportunities and poor decision-making.
Effectively managing these sources is crucial for making informed decisions. Often, some of this data is stored in Excel spreadsheets, which can be utilized as a data source in Azure Data Factory. These spreadsheets are widely used and can sometimes contain key information that is not available elsewhere.
In this blog, you will find:
💡 Understanding Azure Data Factory and Excel File Integration
🤔 Why is using Azure Data Factory essential for your company?
🗃️ How do I Import an Excel file into a SQL Database?
🎬 Enhance your understanding of Azure Fundamentals with our On-Demand Webinar Series
Understanding Azure Data Factory and Excel File Integration
Azure Data Factory (ADF) supports reading data from Excel files, which are commonly used in many organizations. However, there are some important considerations and limitations to keep in mind:
Key Points to Note
✔️ Excel File Support: ADF supports reading both .xls and .xlsx files. This means you don't need to convert .xlsx files to .csv format to read them in ADF.
✔️ Excel as a Source, Not a Sink: While ADF can read data from Excel files, it does not support writing data back to Excel files. This means you cannot use Excel files as a destination (sink) for your data pipelines.
Workarounds for Excel Integration
✔️ Binary Copy: You can use the Binary Copy feature to copy .xlsx files without converting them to .csv.
✔️ Power Automate: Another approach is to use Power Automate (formerly Microsoft Flow) to export an Excel table as a CSV file and then trigger the ADF process. This method allows you to leverage ADF's capabilities to process data from Excel files effectively.
By understanding these points, you can better utilize Azure Data Factory to integrate and process data from Excel files, despite the limitations. Now, let's dive into the specifics of loading multiple Excel sheets into ADF.
Why is using Azure Data Factory essential for your company?
Integrating data from various sources can provide valuable insights into your business. Azure Data Factory (ADF) helps you do this by allowing you to create data pipelines. Here’s why ADF is essential:

✅ Excel Connector: ADF's Excel connector makes it easy to load data from large Excel files into Azure SQL Databases. This helps overcome challenges like memory limitations.
✅ Data Integration: By using ADF to gather data from Excel spreadsheets and store it in SQL server tables, you can combine this data with other relational and non-relational data. This is useful for ETL (Extract-Transform-Load) processes and reporting.
✅ Memory Management: When dealing with large Excel files, ADF handles memory limitations by loading the entire file into memory for operations like data preview and schema import.
Using ADF streamlines your data integration processes, helps you overcome technical challenges, and unlocks valuable insights from your data.
Related Blogs
Power BI Data Sources: A Detailed Look at Loading Your Data Into Power BI
Making the Most of MS Power BI Dataflows
9 Tips for Building your Business Intelligence Project
How do I Import an Excel file into a SQL Database?
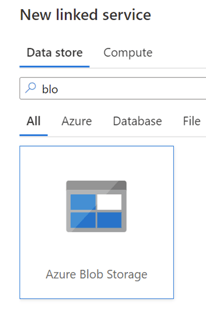
The first step we need to do is to store the Excel spreadsheet where the Azure Data Factory (ADF) is able to access it. There are a lot of connectors built for Azure Data Factory already. In this example we will use one of the less expensive services in Azure called Blob Storage. There is a process to save and replace the file in the Blob Storage every time new data is added. Once the file is uploaded there, we can start the process in Azure Data Factory.
Step 1: First we need to create the linked service to the source (Blob Storage)
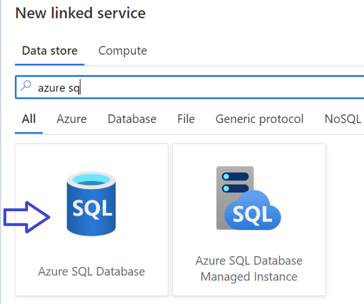
Step 2: Then we have to create the linked service to the target, it will be an Azure SQL database in this example, but it could be any relational database, or a csv file stored in another storage location.
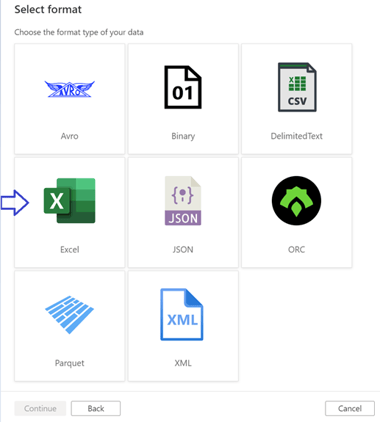
Step 3: When we create the dataset for the source, we have to select Excel as the format
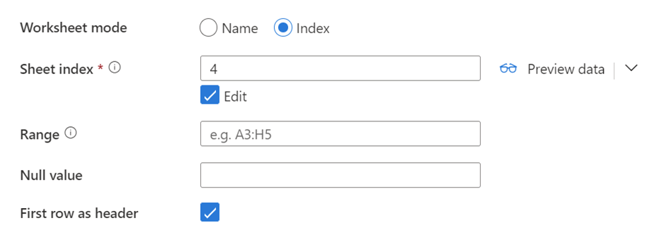
Step 4: In the connection settings of the dataset, we have 2 options to manage the sheets inside the spreadsheet, this option is called Worksheet Mode. Which option to choose will depend on how the file sheet names could vary over time.
The first option, called Name, will match the name defined with the name in the sheet in the file. If the sheet name changes for any reason the pipeline won’t grab the data on that sheet.

The second option, Index, will start from 0 (It is always an incremental number starting at 0) from left to right, assigning an index to each sheet. It doesn't matter if the name changes it will always select the same sheet by the index.
Step 5: If the file has several sheets, you must repeat this process and create a dataset per sheet that you want to access the data from.
Another important setting to define is the Cell range, this will define which subset of cells to grab from the sheet. If the sheet has data in more than one range, it is needed to define another dataset.
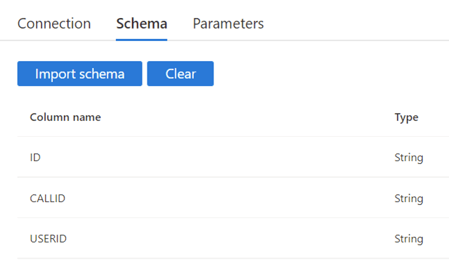
 Step 6: One final step to creating the dataset is to import the schema. In this example we will use the first row as header.
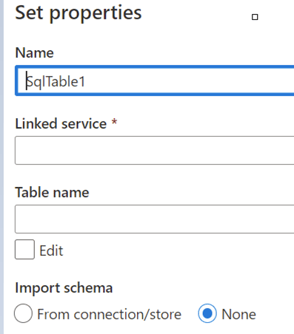
 Step 7: Following the creation of the source dataset we have to create the target dataset. In this example, we will create a single table directly in the SQL database. The table created will have the same columns as the Excel file in this example, but you could map the result to any table or columns you define.
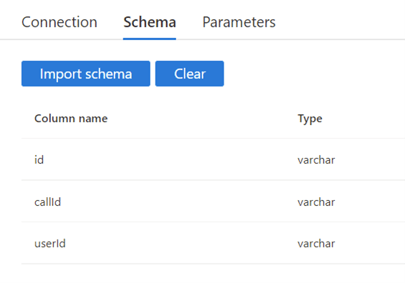
When the dataset is created, import the schema which should look like this:
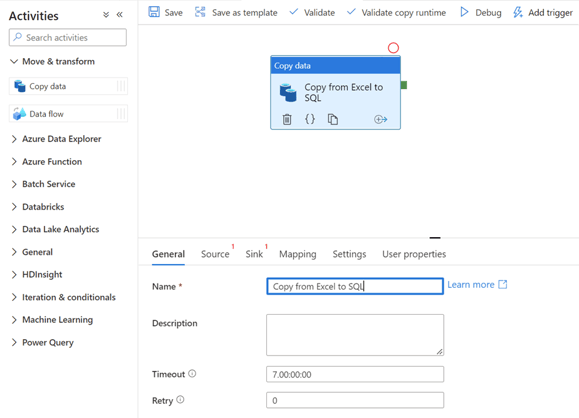
 Step 8: Now that we have both datasets, we will proceed to create a new Pipeline. In the pipeline we will add a Copy activity like the image below:
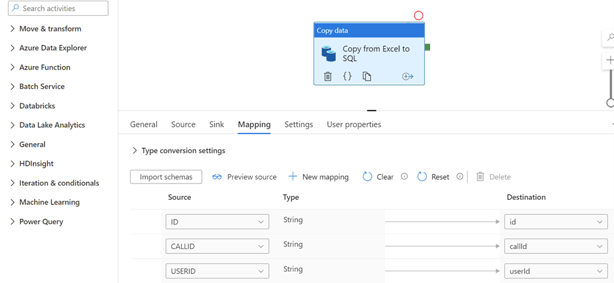
Step 9: In the Source tab we will select the Excel dataset created before. In the Sink tab, we have to choose the SQL database we created. In the mapping tab, we will define which columns from the Excel spreadsheet will map to which columns on the SQL table.
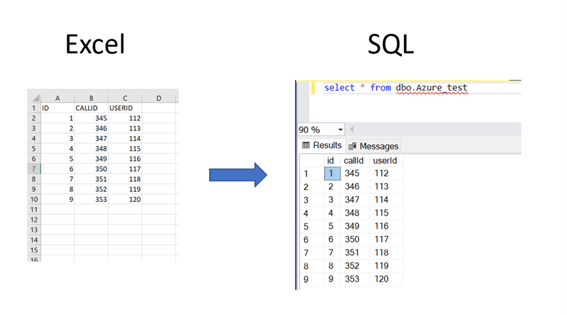
Step 10: We just have to save the pipeline and execute it manually or define a periodic trigger. The result should look like the below:
If any transformations need to be done to the data in the Excel spreadsheet, we can also use other activities or transform the data using a Dataflow.
As a company, you will have data scattered across many different systems. By using Azure Data Factory to load Excel spreadsheets into structured databases and analyzing the information for insights, your team can be more productive by finding all the relevant information in one place.
Enhance your understanding of Azure Fundamentals with our On-Demand Webinar Series
Elevate your data management and empower your team with streamlined insights. Our Azure Fundamentals webinar series is the key to unlocking the full potential of Azure for your organization. As you streamline your data using Azure Data Factory, the journey doesn't end there. Dive into our webinar to gain in-depth insights into Azure Virtual Desktop, confidently navigate the Cloud migration process, explore essential migration tools and techniques, and get an exclusive introduction to Windows 365. Join us on this transformative Azure journey, ensuring that your organization is equipped with the knowledge and tools needed for success. Ready to harness the power of Azure? Watch ProServeIt's Free On-Demand Webinar Series Today.

Dive into our webinar to gain in-depth insights into Azure Virtual Desktop, confidently navigate the Cloud migration process, explore essential migration tools and techniques, and get an exclusive introduction to Windows 365. Join us on this transformative Azure journey, ensuring that your organization is equipped with the knowledge and tools needed for success.
Ready to harness the power of Azure? Watch ProServeIt's Free On-Demand Webinar Series Today.
Conclusion
Effectively acquiring, cleansing, transforming, and storing data is essential for businesses to stay competitive in today’s dynamic environment. Azure Data Factory simplifies these processes by integrating various data sources, overcoming challenges like memory limitations, and enabling centralized data management for insightful analysis. Organizations can streamline their data pipelines and unlock valuable insights to drive informed decision-making by leveraging tools like Azure Data Factory.
At ProServeIT, we have helped businesses across industries optimize their data strategies to achieve meaningful results. Whether it’s integrating Excel files, preparing for Cloud migrations, or building robust BI solutions with Power BI, we’re here to support your data journey. Visit our Insights & Automation page or Power BI – Cloud Solutions page to learn more, or book a call with us today to discuss your unique requirements. Don’t forget to explore our Azure Fundamentals webinar series to gain in-depth knowledge of Azure solutions like Azure Virtual Desktop, Cloud migration tools, and Microsoft 365. Watch now and begin transforming your data into a strategic advantage.

Oscar is a skilled Data Analyst with a strong background in Software Development. With expertise in data-driven decision-making and technical problem-solving, Oscar leverages both analytics and development skills to deliver impactful insights and innovative solutions.


Comments